I saw this super cute headband on Pinterest. You can view the picture HERE. I didn't want to post it without permission. It inspired me to make one of my own for the girls.
Supplies:
Felt in red, white and blue
White elastic
(I bought my satin elastic from Pamper Your Princess on Etsy)
Hot glue gun
Needle and thread in red, white and blue
Step 1: Cut three strips of felt approximately 1" x 12"
Step 2: Twist each piece of felt
Step 3: Holding one end of twisted felt, slowly wrap felt around center, tuck end piece under the bottom
Completed rosette
Step 4: With a needle and thread carefully stitch through all layers
You can also choose to use hot glue and add dots of glue as you wrap
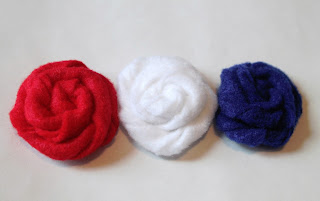
Ta-da! Three pretty little rosettes!
Step 5: Measure your girls' head, from the back of the neck up towards her ears, to the top of her head. Take that measurement and decrease it by about two inches, sense the elastic is stretchy.
I used an 18" piece for Jilian and her head measures 20". But double check before cutting your elastic.
Step 6: Hand stitch the ends of the elastic together
You should have three rosettes and one elastic headband
Step 7: Starting with the white rosette, hot glue it over the seam in the elastic. Next hot glue the red and blue rosettes in place. You want the rosettes close together, even overlapping slightly because when the elastic stretches, there will be a little space between them.
Finished headband
All ready for the 4th of July!
Because linky parties are fun!


No comments:
Post a Comment